How to Add Branding Watermark & Subscribe Button on YouTube Channel | Science Tutor?

October 30, 2017

How to Add Branding Watermark onYouTube Channel | Science Tutor?

In this video we are knowing you How to add Branding Watermark on YouTube Channel Like Shown on Picture below. A Branding Watermark is embedded logo that you can enable to appear in the bottom right corner of each your videos. if you have a YouTube channel and want to add your own brand icon logo in every video this tutorial will help you. If you are want to know How to Add Branding Watermark on YouTube Channel, then Stay Continue to reading unless skip this article.


Step1. First of all, open your YouTube channel and login. Now click on Creator Studio.


Step2. Now Click on Channel on Lift Sidebar Menu On YouTube.
Step3. Now Choose Branding.
Step4. Now Click on Add Watermark and Select Your Required Picture (i.e. Square in Size). And then click on Save.


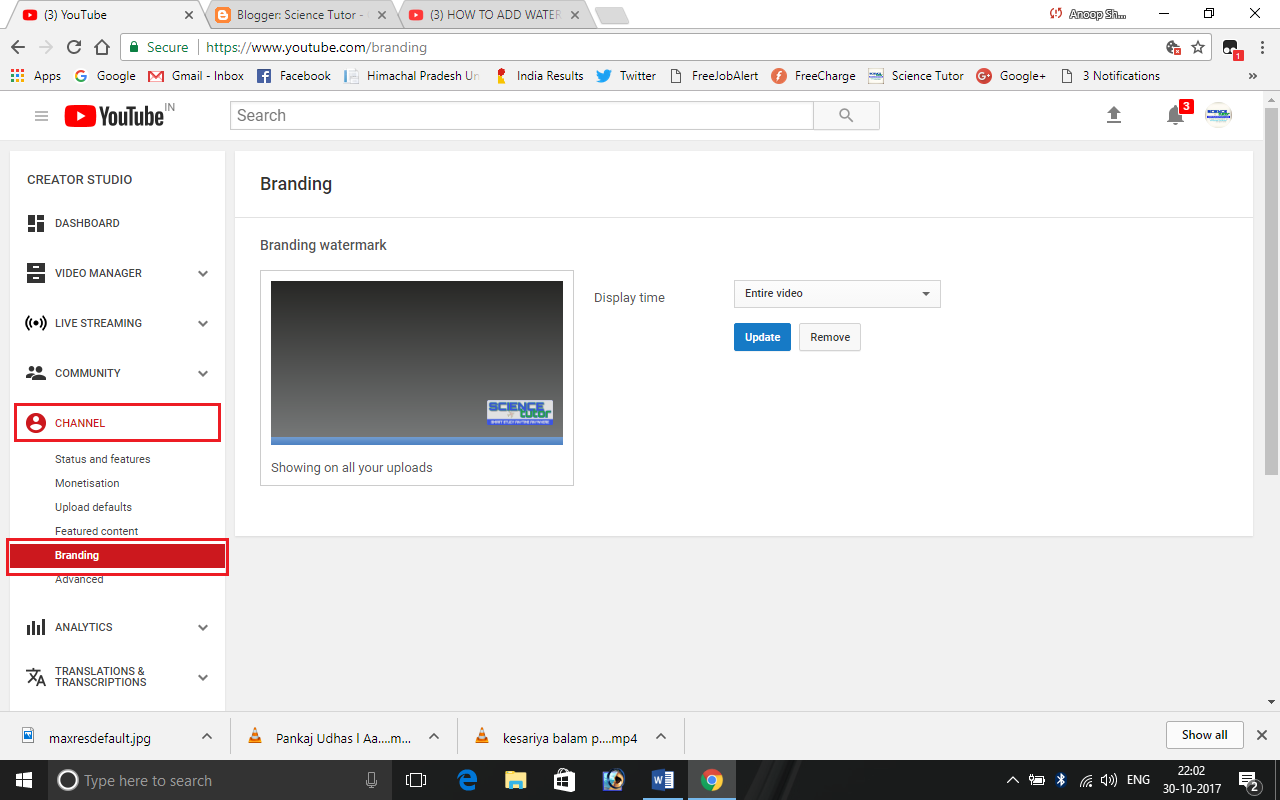
Step5. Now Select Time as Entire Video (For showing your watermark whole the video), At the End (For showing your watermark in last of your video). But we prefer to choose Entire Video. And finally click on UPDATE. You done. For Easily Set Your Watermark Must Watch this Video Also.


© ScienceTutor – Smart Study Anytime Anywhere.
How to Add Branding Watermark & Subscribe Button on YouTube Channel | Science Tutor? How to Add Branding Watermark & Subscribe Button on YouTube Channel | Science Tutor? Reviewed by Anoop Kumar Sharma on October 30, 2017 Rating: 5

Notepad And Its Features | Science Tutor

October 28, 2017

Notepad and Its Features | Science Tutor

Notepad is application is mainly used to create a text document. Notepad supports only very basic formatting. Many people find Notepad a simple tool for creating webpages. The default extension of Notepad is “*.txt”. “Notepad is used as a basic typing tool.”


Features of Notepad

  - This is a simple writing tool.
  - This is a single page application. More than one pages can’t be inserted in one file.
  - Continuous writing is managed by horizontal and vertical scroll bar.
  - There is limited area of text formatting.


Way To Opening Notepad

1. Go to Start Menu > All Programs > Accessories > Notepad.
2. Press Windows + R (Run Command) > Type NotePad > Select Ok.


© ScienceTutor – Smart Study Anytime Anywhere
Notepad And Its Features | Science Tutor Notepad And Its Features | Science Tutor Reviewed by Anoop Kumar Sharma on October 28, 2017 Rating: 5

DESIGN MENU | MS WORD 2016 TUTORIAL | SCIENCE TUTOR

October 27, 2017

DESIGN MENU | MS WORD 2016 TUTORIAL | SCIENCE TUTOR

DESIGN MENU: This menu is helpful for adding Watermarks, Changing Various document format styles, Font colours combinations, Add Various Effects According to your need, Apply preloaded format themes.


THEMES: this group of menu in Design Menu is helpful for changing your format themes that are preloaded with Microsoft word. And change your document format according to your need. Change the colour combinations, Adjust the paragraph spacing and spacing between lines, and lots more as you creative.

PAGE BACGROUND: This group of menu offers your options for apply Watermarks, Change Page Colour, Apply Page Borders etc.
  - Watermark is background picture or text with 50% Opacity. Which is useful for provide your        company Logo, Your Text etc. set as Watermark in MS Word.


  - Page colour option is useful for changing your page background colour as you wish.
  - Page Border option is useful for changing your document Border as you wish.

Download or Buy Microsoft Word - Complete Course - Full Guide - With MCQs at Just Rs. 99/- - Click Here

© ScienceTutor – Smart Study Anytime Anywhere
DESIGN MENU | MS WORD 2016 TUTORIAL | SCIENCE TUTOR DESIGN MENU | MS WORD 2016 TUTORIAL | SCIENCE TUTOR Reviewed by Anoop Kumar Sharma on October 27, 2017 Rating: 5

The All-New Google Calendar is here | Science Tutor

October 25, 2017

The All-New Google Calendar is here.


   Google Calendar for web has been treated to a much needed makeover. The service is one of Google’s most popular online tools, but it’s long looked old and somewhat stale compared to some of the company’s other offerings. The revamped version feels a lot more modern, and has finally caught up with the mobile app.
You can now add far more detail about a meeting room to a calendar event, such as its size and location, and whether or not it has audio/video equipment or is wheelchair accessible. To see the information, all you need to do is hover over the room name in a calendar entry.
   You can also add rich text to calendar invitations, and link out to relevant spreadsheets, documents or presentations in them. Google has made it easier to manage and understand multiple calendars in the Day view too. Once you click Day and select the calendars you want to compare, the new version of Calendar will display them simultaneously, but in separate columns.
    “There are a number of other changes in Calendar, too,” says Google. “Now you can see contact information of meeting participants when you hover over their names in a calendar invite. “There’s also a new way to view and restore deleted items in one place in case you accidentally delete a meeting. Additionally, ‘Day’, ‘Week’, and ‘Month’ views are now more accessible, featuring better compatibility with screen readers.”


    They aren’t enormous changes but they’re welcome and necessary, and should help users stay organized.
To access the new version, open up Calendar and click the Use New Calendar option in the upper right hand corner of the main view. If you can’t see the option, it isn’t available for your account yet.

© ScienceTutor – Smart Study Anytime Anywhere
The All-New Google Calendar is here | Science Tutor The All-New Google Calendar is here | Science Tutor Reviewed by Anoop Kumar Sharma on October 25, 2017 Rating: 5

INSERT MENU | MICROSOFT WORD 2016 TUTORIALS | SCIENCE TUTOR

October 24, 2017

INSERT MENU | MICROSOFT WORD 2016 TUTORIALS | SCIENCE TUTOR

INSERT MENU: Insert menu let you add something you like as cover pages, blank pages, pictures from your desktops and online, tables, shapes (preloaded shapes and online), Videos, Word Arts, and lots more let’s explore it.
Inset Menu Offers You Groups of Menus are PAGES, TABLES, ILLUSTRATIONS, ADD-INS, MEDIA, LINKS, COMMENTS, HEADER & FOOTER, TEXT and SYMBOLS.


 - PAGES: This menu group offers you to add Cover Pages to your document, Blank pages to your documents and create page breaks in documents (Page Breaks mean dividing one pages in several pages).
 - TABLES: This menu group offers you to add tables to your documents for creating tables, spreadsheets, student analysis details, salary sheets etc. like MS EXCEL.
 - ILLUSTRATIONS: This menu group offers you to add pictures in your documents, add pictures online, and add shapes in your documents, add screenshots, add charts and lots more.
 - ADD­-INS: This menu group offers you to add addition application in Microsoft Word (Like Wikipedia, Google Search, etc.)
 - MEDIA: This is offers you to add online videos to you documents.
 - LINKS: This menu offer you adding Hyperlinks, Bookmarks and Cross-reference.
 - COMMENTS: This option is helpful in adding your comment in document you created.
 - HEADER & FOOTER: Header & Footer is helpful in adding Heading and foot notes in the documents you created. And this option is also helpful in adding copyright information in documents.


 - TEXT: This option is useful for styling the text and documents.
 - SYMBOLS: This option is useful for adding symbols, characters and mathematical equations for maths calculations and making scientific documents.

Download or Buy Microsoft Word - Complete Course - Full Guide - With MCQs at Just Rs. 99/- - Click Here


© ScienceTutor – Smart Study Anytime Anywhere
INSERT MENU | MICROSOFT WORD 2016 TUTORIALS | SCIENCE TUTOR INSERT MENU | MICROSOFT WORD 2016 TUTORIALS | SCIENCE TUTOR Reviewed by Anoop Kumar Sharma on October 24, 2017 Rating: 5

Happy Diwali | Wishes Form : Science Tutor - Smart Study Anytime Anywhere.

October 18, 2017
Science Tutor - Smart Study Anytime Anywhere
Wishes You & Your Family A Very Happy Diwali...


May the festival of lights encircle your life with joy and happiness.
Success may always be at your doorsteps. And may 
Goddess Lakshmi enter your home and fill it with 
riches and abundance!
Warm wishes on this auspicious festival of Diwali!
---------------
ये दिवाली आपके जीवन में खुशियों की बरसात लाए,
धन  और  शौहरत  की  बौछार  करे,

दिवाली की हार्दिक शुभकामनाएं!


Happy Diwali To All of Our Followers...
From Team : Science Tutor

Happy Diwali | Wishes Form : Science Tutor - Smart Study Anytime Anywhere. Happy Diwali | Wishes Form : Science Tutor - Smart Study Anytime Anywhere. Reviewed by Anoop Kumar Sharma on October 18, 2017 Rating: 5

HOME MENU – MICROSOFT WORD 2016 TUTORIALS – SCIENCE TUTOR.

October 13, 2017

HOME MENU – MICROSOFT WORD 2016 TUTORIALS – SCIENCE TUTOR.

HOME MENU: this menu provide you all basic editing tools like fonts, paragraph setting, heading styles and many more as mention below, in this menu button you will find CLIPBOARD, FONTS, PARAGRAPH, STYLES and EDITING.


CLIPBOARD: In this Group you will find Paste, Cut, Copy and Format Painter.
  - Cut is use to delete the text from one place.
  - Paste is use to paste the deleted text to another place.
  - Copy is use to paste the text to another place without deleting text.
  - Format Painter is use to copy formatting from one text to another text.


FONT: In this section you can change font size, font style, change the font colour, use subscript and super script, Change text case (i.e. form lower to upper, upper to lower, lower to toggle, etc.). This section also provide option for highlighting the text by using Bold, Italic and Underline and Text Highlight Colour.


Paragraph: this section provide you all paragraph setting tool like alignments, line and paragraph spacing, Shading, Borders, Bullet and Listing and Sorting.


Style: this section provide you various heading styles such as – Normal, No Spacing, Heading 1, Heading 2, Title, Subtitle, Emphasis, Strong, Quote, etc.


Editing: In this section you will able to Find the desired text, replace a text with another you desire.


Download or Buy Microsoft Word - Complete Course - Full Guide - With MCQs at Just Rs. 99/- - Click Here

© Science Tutor – Smart Study Anytime Anywhere.

HOME MENU – MICROSOFT WORD 2016 TUTORIALS – SCIENCE TUTOR. HOME MENU – MICROSOFT WORD 2016 TUTORIALS – SCIENCE TUTOR. Reviewed by Anoop Kumar Sharma on October 13, 2017 Rating: 5

FILE MENU - M.S. WORD 2016 TUTORIALS - SCIENCE TUTOR

October 12, 2017

FILE MENU - M.S. WORD 2016 TUTORIALS - SCIENCE TUTOR

Download or Buy Microsoft Word - Complete Course - Full Guide - With MCQs at Just Rs. 99/- - Click Here

FILE MENU: file menu is the first menu button in menu bar provided by M.S. Word 2016. In this menu you will access all options like information of your document, protection of document, creation of new file, open your created files, save your document and save your changes in documents, printing and sharing of document, account related information and properties of document you created.
File menu provides you various options such as INFO, NEW, OPEN, SAVE & SAVE AS, PRINT, SHARE, EXPORT, CLOSE and ACCOUNT.


1. INFO: INFO option provide you information about your document like page size, page number, numbers of words, total editing time, title of document, tags, comments, authors details, properties and last modified. You may also manage document protection, inspect your document and version of MICROSOFT OFFICE you used.


2. NEW: this option let you to create new document by choosing various document layouts and a custom layout or make a new document on black page. The various layouts provided by M.S. Word 2016 are Adjacency Letters, Adjacency Reports, Adjacency Resumes, Apothecary Letter, Apothecary Newsletters, Apothecary Resume, Blog Post, Chronological Letters, Essential Reports, and Essential Letter etc.


3. OPEN: through this option you may open your recently created documents, saved documents, and that documents save in various drives (A:, B:, C:, D:, E:, F: etc.) and locations.


4. SAVE & SAVE AS: SAVE option let you to save youre newly created document in M.S. Word and while SAVE AS option let you to save a copy of recently save documents with another name.


5. PRINT: this option is very useful for taking print of your document on the paper. Through this option your will able to manage your attached printers, choose page size, Page orientations, and choose numbers of page to print, numbers of copies etc.


6. SHARE: this option provide you various sharing methods for your documents Like Email, Blog etc.


7. EXPORT: this option is helpful for creating PDF, XPS, and other documents files for your M.S. Word Document.


8. CLOSE: this option Close your document window.


9. ACCOUNT: this option provide various option for accessing your account (User Information) like your name, profile picture, and lots more.


Download or Buy Microsoft Word - Complete Course - Full Guide - With MCQs at Just Rs. 99/- - Click Here

© Science Tutor – Smart Study Anytime Anywhere
FILE MENU - M.S. WORD 2016 TUTORIALS - SCIENCE TUTOR FILE MENU - M.S. WORD 2016 TUTORIALS - SCIENCE TUTOR Reviewed by Anoop Kumar Sharma on October 12, 2017 Rating: 5

Some Useful Question from Microsoft Office Word | Science Tutor

October 11, 2017

Some Useful Question from Microsoft Office Word by Science Tutor.


Microsoft Word is:
A) A type of chat room found in Microsoft
B) A spreadsheet database
C) A webpage
D) A word processing application

Where can you type in Microsoft Word?
A) You can’t type in Microsoft word
B) In the Text Area
C) In the toolbar
D) In the Spacebar


What are some ways to erase typing in Microsoft Word?
A) Backspace
B) Delete
C) Insert
D) All of the Above

When you save a document for the first time, what should you do?
A) Close Microsoft Word because the program saves everything automatically
B) Under file highlight save as, choose a drive, type in name for the document, and then click ok.
C) Highlight “save” under file
D) Click on the icon that looks like a disc

How do you open a document once you have saved it?
A) Click on the icon that looks like a white sheet of paper
B) Your most recent document will automatically appear when you open
A) Microsoft Word
B) Under File, highlight Open
C) Under View, Highlight Open


When you would like to print a document, you:
A) Click on the icon that looks like a printer
B) Under file, click print
C) Under file, click print preview
D) Both A & B

Which Key allows you to type in ALL CAPITAL LETTERS?
A) Control (Ctrl)
B) Insert
C) Caps Lock
D) Shift + F5

How do you preview what you are going to paste?
A) Click on the Paste icon
B) Pressing Shift + F8
C) Do a left click on the space where you want to paste and go to Paste options.
D) You can’t preview.

Can you change the size of the text?
A) No
B) No, but you can change the style of the font
C) Yes, by highlighting text and then use the shift key
D) Yes, by clicking on the small downwards arrow next to the font size box, and then highlighting the desired font size

How to you Cut and Paste text?
A) Click on the scissor icon
B) Use the insert key, and then type in the desired text
C) Shift F10, highlight text, and press the delete key
D) Highlight the text using the mouse, right click highlight cut, and click where you would like the text to be and then right click and highlight paste

Note: correct answers are underlines.


Download or Buy Microsoft Word - Complete Course - Full Guide - With MCQs at Just Rs. 99/- - Click Here

© Science Tutor – Smart Study Anytime Anywhere
Some Useful Question from Microsoft Office Word | Science Tutor Some Useful Question from Microsoft Office Word | Science Tutor Reviewed by Anoop Kumar Sharma on October 11, 2017 Rating: 5

HOW TO TAKE OUT A PRINT OF DOCMENT IN M.S. WORD IN JUST 5 STEPS.

October 05, 2017

How to take out print of a Document in Ms Word in just 5 steps.

Today I am gona to show you how to take out print of the document on paper form printer.
Step.1. First of all open your document and set page size from PAGE LAYOUT menu in which size of paper you want to take out print of your document. Commonly used size is A4.

Step.2. Now Go to the FILE MENU and select PRINT option or just Press Shortcut Key CRTL + P.

Step.3. Now select current printer that you attached to your PC, DESKTOP or LAPTOP.

Step.4. Select number of copies you want to print.


Step.5. Finally Click on the PRINT button to take out print.


Must watch this video tutorial also...


Download or Buy Microsoft Word - Complete Course - Full Guide - With MCQs at Just Rs. 99/- - Click Here


© Science Tutor – Smart Study Anytime Anywhere
HOW TO TAKE OUT A PRINT OF DOCMENT IN M.S. WORD IN JUST 5 STEPS. HOW TO TAKE OUT A PRINT OF DOCMENT IN M.S. WORD IN JUST 5 STEPS. Reviewed by Anoop Kumar Sharma on October 05, 2017 Rating: 5
Powered by Blogger.